Part of setting up a new cam is adjusting the position of the camera on the windshield, and the angle of the lens. I wanted it centered, left-to-right, because the window curves away from the center, and the camera mounts flush to the glass, so the further from center, the more the camera will be pointing off to one side or the other ( A downside to a flush-glass-mounted camera). I also wanted the camera to be as high-up as possible, so I could aim ‘down’ to capture the sides of the front fenders as much as feasible, but still capture traffic lights and such.
On most cars, the inside rear-view mirror is the perfect location, and taken. If you mount the camera below the mirror mount, that will put it in your direct line of sight while driving. Not only do you have to mount the camera to one side or the other of the mirror mount, but you have to leave some space to slide the camera body to unmount it, so you need clearance to the right if an A119, and space at the top if an A129. And because the front lens captures a wide-angle view, you want to mount the camera so the lens won’t pick up the mirror mount assembly. You might be able to experiment with positions using removable glue dots- I didn’t try that.
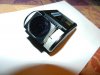
The lens rotates up/down to adjust to the angle of the windshield. If you remove your camera when you park, it can be easy to unintentionally move the position of the lens barrel. I chose to fix it in position with RTV silicone sealant. First I put tape on the barrel and the mounting arms, so I could mark where the lens was positioned. I drove the car around and then looked at the images captured. If I needed to adjust it, the marks helped me make only a small change at a time. When I felt the images captured had a good balance top-to-bottom, I used the RTV silicon sealant to lock the barrel in place. A bead is placed on either side of the lens, as a ‘bridge’ between the lens barrel and the arm, not filling in the groove itself. This way, I can cut away the bridge of silicon material if I ever need to reposition the lens. I used RTV high-temp silicone (available at ACE) because my first effort was with hot-glue-gun stick adhesive, and while that seemed to work, it softened and ‘flowed’ when the camera was left in the sun. The RTV high-temp silicone (also called “gasket” sealant) is rated for 400 degrees.
And if you do stick your mounting pad in a bad place and have to relocate it, the tip to use flossing string to free up the pad is a good one. It takes a while, and you’ll likely have to pull long pieces from a floss dispenser and make loops on the ends to grip with a finger of each hand, but it does work without risking cracking your windshield.


On most cars, the inside rear-view mirror is the perfect location, and taken. If you mount the camera below the mirror mount, that will put it in your direct line of sight while driving. Not only do you have to mount the camera to one side or the other of the mirror mount, but you have to leave some space to slide the camera body to unmount it, so you need clearance to the right if an A119, and space at the top if an A129. And because the front lens captures a wide-angle view, you want to mount the camera so the lens won’t pick up the mirror mount assembly. You might be able to experiment with positions using removable glue dots- I didn’t try that.
The lens rotates up/down to adjust to the angle of the windshield. If you remove your camera when you park, it can be easy to unintentionally move the position of the lens barrel. I chose to fix it in position with RTV silicone sealant. First I put tape on the barrel and the mounting arms, so I could mark where the lens was positioned. I drove the car around and then looked at the images captured. If I needed to adjust it, the marks helped me make only a small change at a time. When I felt the images captured had a good balance top-to-bottom, I used the RTV silicon sealant to lock the barrel in place. A bead is placed on either side of the lens, as a ‘bridge’ between the lens barrel and the arm, not filling in the groove itself. This way, I can cut away the bridge of silicon material if I ever need to reposition the lens. I used RTV high-temp silicone (available at ACE) because my first effort was with hot-glue-gun stick adhesive, and while that seemed to work, it softened and ‘flowed’ when the camera was left in the sun. The RTV high-temp silicone (also called “gasket” sealant) is rated for 400 degrees.
And if you do stick your mounting pad in a bad place and have to relocate it, the tip to use flossing string to free up the pad is a good one. It takes a while, and you’ll likely have to pull long pieces from a floss dispenser and make loops on the ends to grip with a finger of each hand, but it does work without risking cracking your windshield.